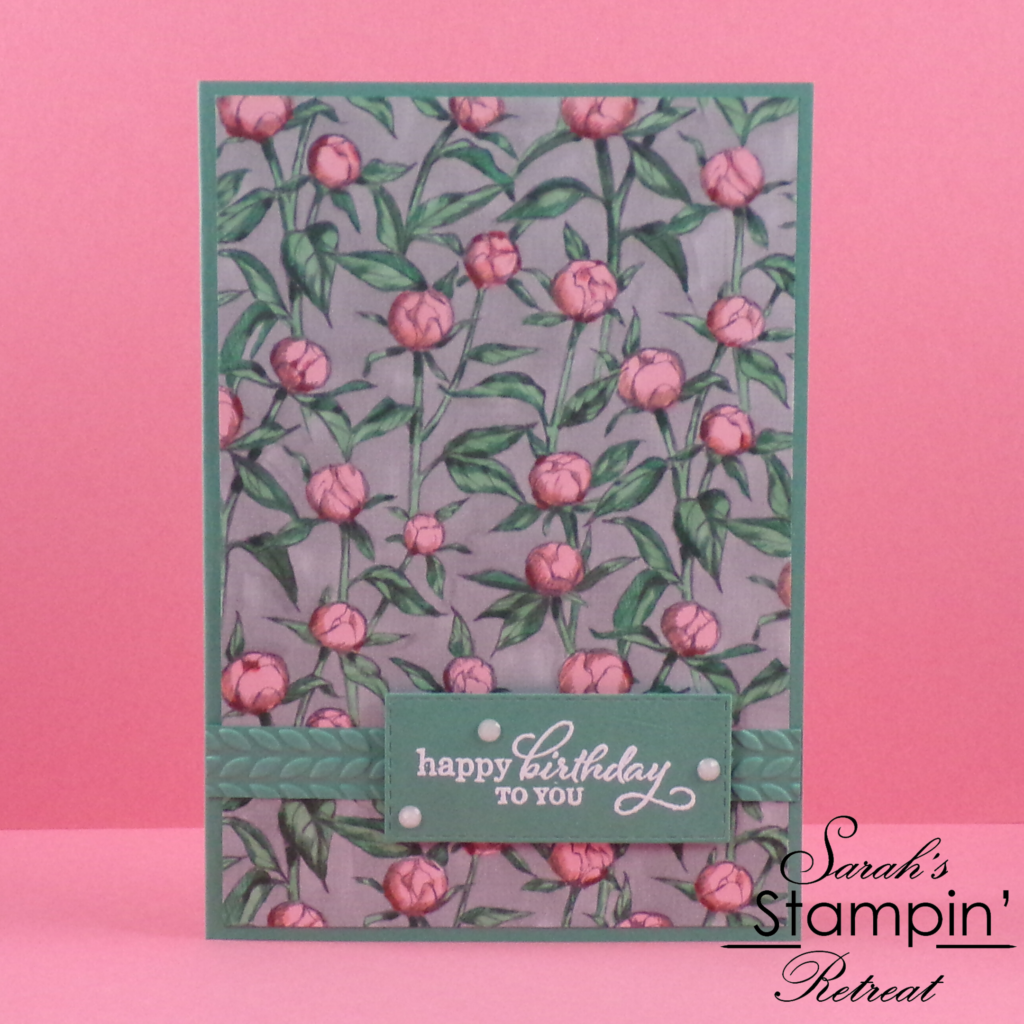
Hello Crafters! How are you? Do you like colouring? If so then you will LOVE creating this card! I love to colour, and coloured the piece of paterned paper for this card while I was watching TV one night in the week. It’s a great way to unwind. I have a load of adult colouring books which I really enjoy doing, but the best part about colouring a patterned paper like this is that I know I have a use for it once it’s finished – it definitely appeals to my practical side! But I created a simple layout because after all of that colouring you don’t want to cover over too much of your lovely paper!
There are two different greyscale patterns in the Peony Garden DSP (patterned paper) pack (and you get two sheets of each) which are perfect for colouring. I like to cut them up first, down to the size that I need for my card, and then colour them, as I like to try out different colour combinations, but if you wanted a set of matching or coordinating cards, you could always colour the whole sheet first and then cut it up afterwards.
The other nice thing about them being greyscale images is that if, like me, you are improving on your colouring skills, the image gives a great guide as to where to put your shading. You can just add the darkest shade where the darkest part of the image is, and the lightest where the image is white.

Peony Garden Designer Series Paper [152483] £10.75
Tutorial – Adult Colouring Peony Garden Handmade Birthday Card
To create your card blank score and fold an A5 (5 7/8″ x 8 1/4″) piece of Just Jade cardstock in half. Then cut a piece of the greyscale patterned paper from the Peony Garden pack 1/4″ smaller than your card front (5 5/8″ x 3 7/8″).
Have a lovely bit of “me” time colouring your lovely piece of patterned paper, placing your darkest colours where the shading on the paper is darkest, and the lightest ones where the paper is white.
Cut a strip of Just Jade cardstock approximately 1/2″ x 4 1/8″ and emboss it using the Greenery Embossing Folder.
Heat emboss your sentiment in White on a scrap of Just Jade cardstock (I used that one I love from the Best Year stamp set AGAIN!) and cut it out using one of the stitched rectangle dies. [Not sure how to heat emboss? Watch my video tutorial HERE]
Layer up all of the elements on your card, adding the sentiment with Stampin’ Dimensionals (double sided foam pads), then complete it with some white faceted gems.
I hope you enjoyed this project. Click the links below to shop the products used to make it.
JOIN MY TEAM Product List ")


Widget not in any sidebars
The form you have selected does not exist.
Sarah Phelan, Independent UK Stampin’ Up Demonstrator
Sarah Phelan, Independent UK Stampin’ Up Demonstrator