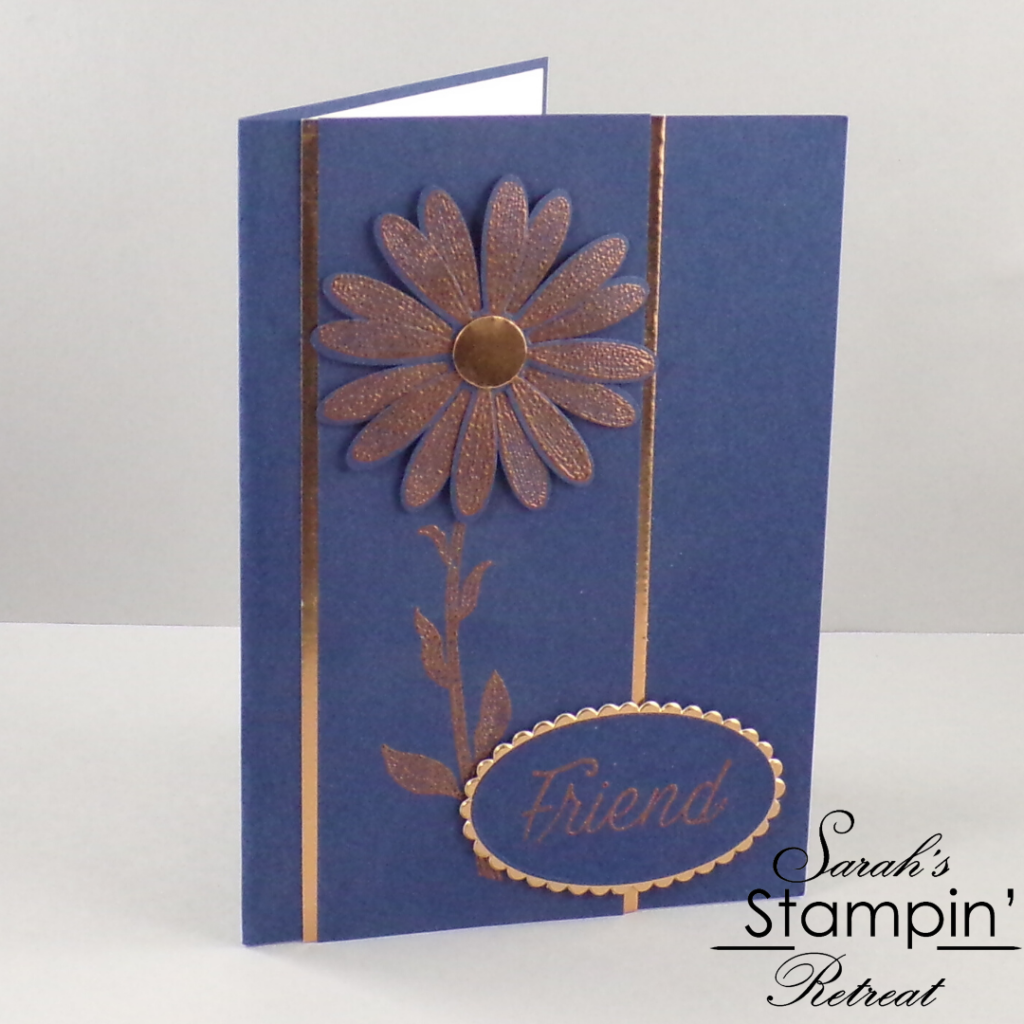
Good Morning Crafters! How are you today? I think that we all miss our friends at the moment, so it’s nice to send a card to let them know that you’re thinking of them and to brighten up their day, so today I’m sharing this friend card using the Daisy Lane stamp set.
This uses a lot of heat embossing using copper embossing powder, so for those of you that watched my beginner’s guide (here) a couple of week’s ago, this is another step up – the same simple process, but the heat embossing is the main feature of the card.
The daisy lane stamp set is really versatile; you can make gorgeous pastel spring cards, bright summer cards, or lovely elegant cards like the one we’re making today. We’ll use the large punch today, but you can also buy a small punch to cut out the small daisy in the stamp set.
Product List

Read on for the tutorial and full shopping list!
Tutorial – Daisy Lane Friendship card
To create your card base, score and fold an A5 piece of Night of Navy cardstock in half to create an A6 card blank.
Cut a panel from Night of Navy cardstock, the same height as your card and 2 1/4 inches wide, and another one from Copper Foil sheet the same height again and 2 1/2 inches wide.
Heat emboss the daisy stem towards the bottom of your Night of Navy panel using Copper Embossing powder (heat embossing guide here if you haven’t done this before), then on a scrap of Night of Navy Cardstock heat emboss 2 daisies and the “Friend” sentiment, making sure not to get them too close together so you have room to cut them out.
Use your Daisy punch to punch out the daisies, and one of the layering oval dies to die cut the “Friend” sentiment. Then, use the coordinating scalloped oval die from the same set to die-cut a matt for your sentiment from Copper foil sheet, and use a 1/2″ hole punch to punch a circle from the copper also.
Offset your two daisies and glue them together, adding the copper circle as a flower centre with a Stampin’ Dimensional (foam pad).
Glue the “Friend” sentiment to the scalloped copper oval.
To complete your card, layer your Navy panel on top of the copper one, then add your daisy with Dimensionals at the top of the stem. Finish by adding your sentiment, also with Stampin’ Dimensionals.
I hope you enjoyed this project. Click the links below to shop the products used to make it.
JOIN MY TEAM Product List  Circle Punch")


Widget not in any sidebars
The form you have selected does not exist.
Sarah Phelan, Independent UK Stampin’ Up Demonstrator
Sarah Phelan, Independent UK Stampin’ Up Demonstrator