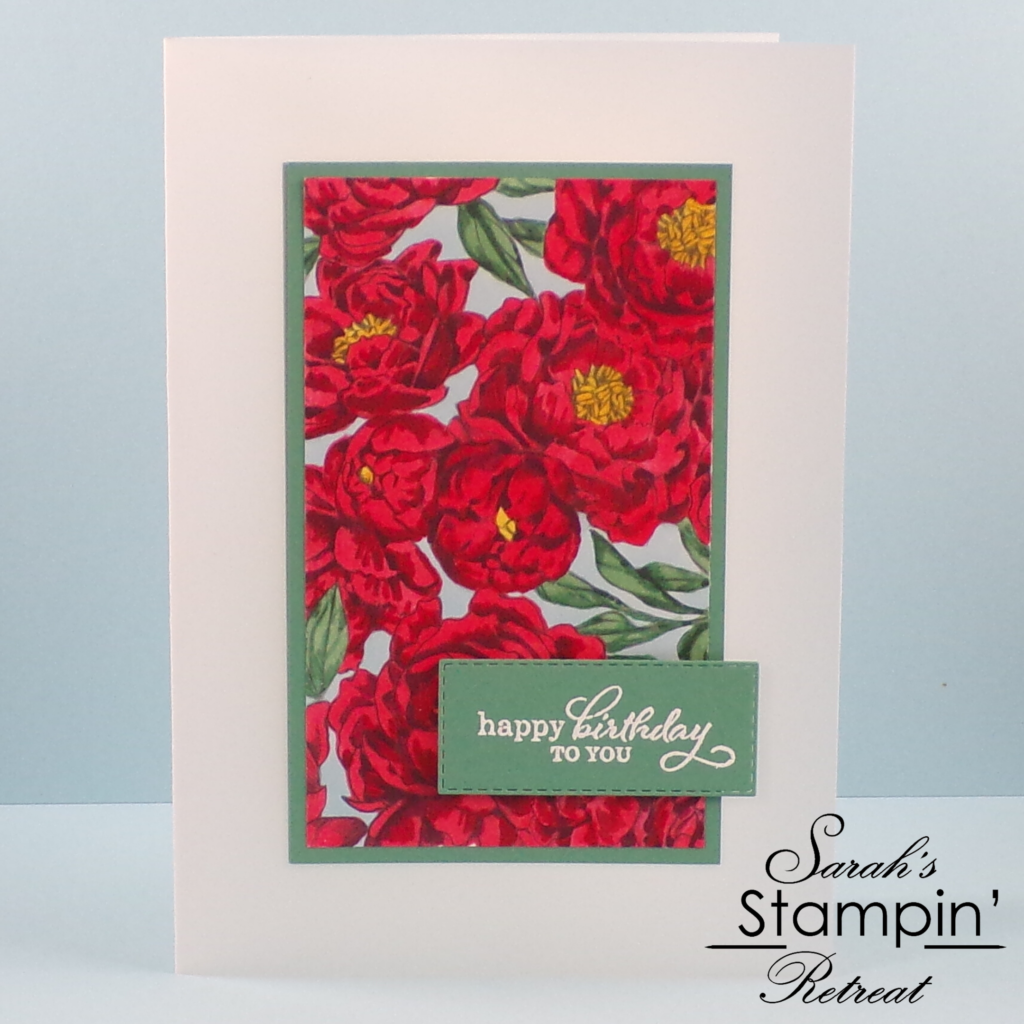
Hello Crafters! How are you today? Today’s card is a vellum card (although it’s difficult to tell from the picture!), so it has a lovely opaque backing which makes it pretty unique – and I think that’s one of the nicest things about making your own cards – creating something personal and unique that lets the recipient know that you’ve made a lot of effort! I’m not going to lie, this is not a quick card, but that’s because of the colouring – if you don’t like colouring or just want a quick card, you could always use the layout with one of the other Peony Garden patterned paper sheets! But I chose to colour one of the greyscale ones as I loved the look of the deep red peonies.

152483 £10.75
Tutorial – Peony Garden Vellum Handmade Birthday Card
To create your card blank, score and fold a 7″ x 10″ piece of vellum cardstock in half (tip: you may find it best to burnish the fold, then open it up flat a couple of times before you’re happy with the way that the card opens and closes due to the consistency of the vellum cardstock).
Cut a piece of the greyscale Peony Garden DSP (patterned paper) 3″ x 5″ and colour it using your Stampin’ Blends, using the darkest colours on the darkest part of the greyscale image, and the lightest colours where the image is white.
Cut 2 pieces of Just Jade Cardstock and 2 pieces of Whisper White, all measuring 3 1/4″ x 5 1/4″. Glue the coloured peony paper to one of the Just Jade pieces and glue it to the front of your card. Glue the other Just Jade piece behind it on the inside of your card to ensure you can’t see the glue marks through the vellum. Then, on the back of your card, glue one of the Whisper White pieces, lining them up with the Just Jade pieces that you will be able to see through the vellum. Add the final Whisper White piece on the inside of the card, covering the area where you’ve glued the other piece to the back of your card. Doing this will create a professional-looking finish.
On a scrap of Just Jade cardstock, stamp and heat emboss your sentiment using white embossing powder [not sure how to heat emboss? See my video tutorial HERE]. Cut it out using one of your stitched rectangle dies and add it to your card with Stampin’ Dimensionals.
I hope you enjoyed this project. Click the links below to shop the products used to make it.
JOIN MY TEAM Product ListWidget not in any sidebars
The form you have selected does not exist.
Sarah Phelan, Independent UK Stampin’ Up Demonstrator
Sarah Phelan, Independent UK Stampin’ Up Demonstrator


